Stained Blush Without the Blotch: Applying Watercolor Cheek Tints
Liquid and water-gel blush goes patchy because of speed and prep, not the formula. Here is the small-area, damp-finger method that fixes the blotch for good.
A $23 tube of Rare Beauty Soft Pinch can make you look like you fell asleep on a radiator, and the formula is not the problem. Water-gel and liquid blushes are the most pigmented, longest-wearing cheek color available right now, and they are also the easiest to apply badly. The patchiness everyone complains about almost never comes from the blush itself. It comes from two fixable mistakes: working too slowly, and putting the color onto a surface that fights it.
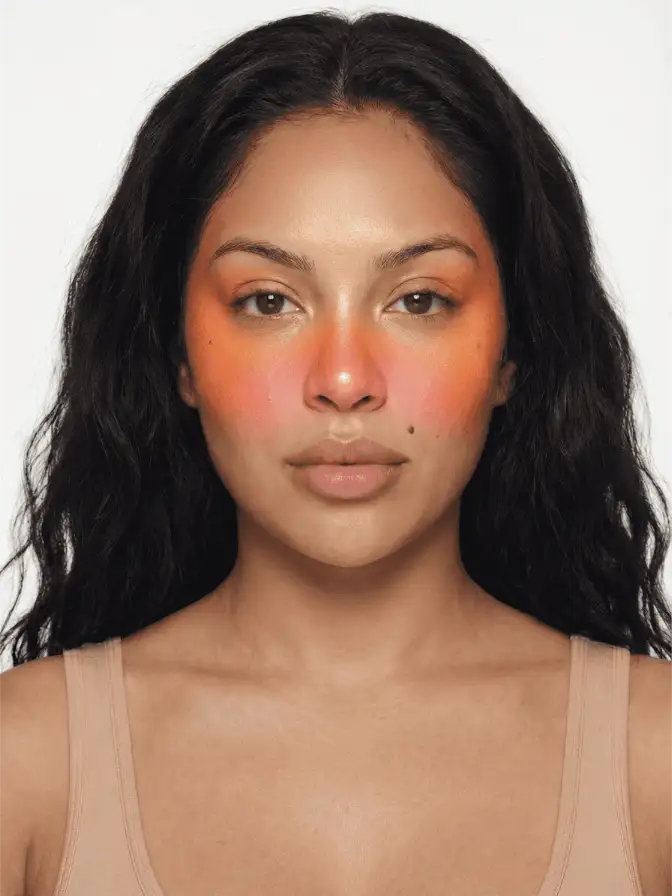
Understand what these formulas are doing and the fix becomes obvious. A modern water-gel blush, the Rare Beauty type, suspends a heavy load of pigment in a fast-evaporating base. The moment it hits skin, the water starts leaving, and the pigment grabs wherever it has landed. That is a feature, because it is what makes the color survive a humid day better than a powder ever could. It is also the trap. You have a few seconds of working time, and any dry patch, any flake, any spot of silicone primer that repels water will catch more pigment than the smooth skin around it. The result is a blotch, and once a water-gel blush has set, that blotch is welded on.
The two failures, named
The first failure is speed. People dispense the blush, dot it across the cheek, reach for a brush, and by the time the brush arrives the edges have already locked. There is no recovering that with more buffing; you just smear a dried film. The second failure is the canvas. If the skin underneath is uneven, dehydrated in places, or sitting under a mattifying primer designed to repel exactly this kind of water-based product, the blush has no even surface to spread across. It pools where it can and skips where it cannot.
Both failures point to the same solution, and it is a method Japanese makeup has used for years. The igari blush look, that flushed, just-ran-here warmth high on the cheeks, is traditionally built with fingers and small amounts, tapped rather than swept. Fingers are warm, which keeps the product workable a beat longer, and they let you feel exactly how much is going where. That tactile control is the whole game with a fast-setting formula.
The method, step by step
Start with the canvas. Moisturize evenly and give it two or three minutes to sink in, so the surface is hydrated but not slick. If you use a primer, use a hydrating or grippy one, not a silicone mattifier, because the mattifier is engineered to make water bead and run. Apply your base first if you wear one, and leave it slightly tacky. Do not powder yet. Powder before blush is the single most common cause of the welded blotch, because powder grabs pigment on contact and gives you no working time at all.
Now dispense almost nothing. One small dot per cheek, less than you think, on the back of your hand first if the applicator over-pumps. You can always add a second layer; you cannot remove a first one. Touch your fingertip into it, then press, do not drag, the color onto the apple and along the cheekbone in two or three small taps. Work one cheek completely before you touch the other, because the clock is running the second the product lands.
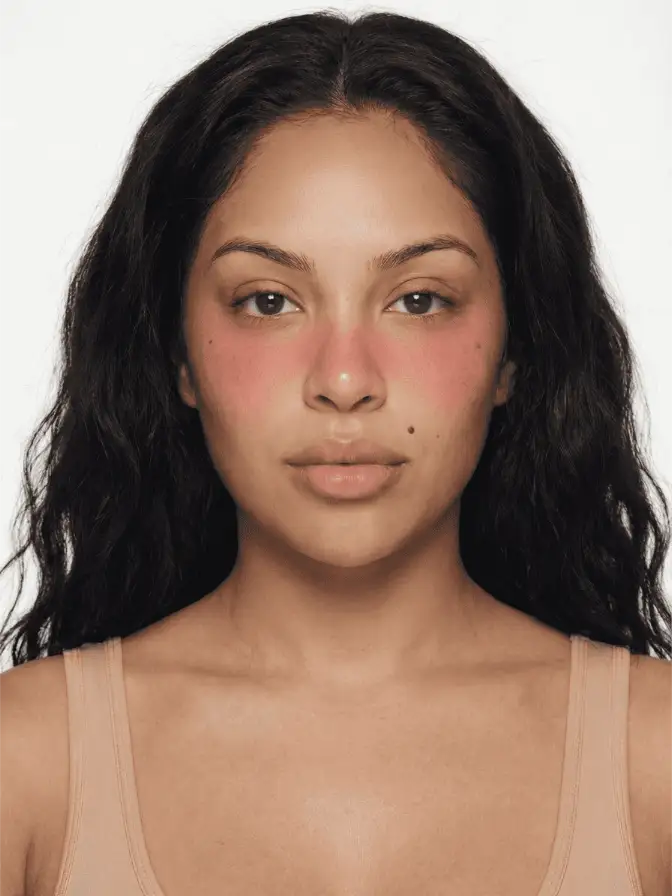
Blend with what is already there, not with more product. Use a clean, slightly damp fingertip or a barely damp sponge to feather the edges outward and up toward the temple. The faint moisture re-opens the working time just enough to soften a hard line. If you want more color, wait until the first layer is dry and repeat the whole sequence with another tiny dot. Thin layers stack into a saturated flush; one thick layer dries into a stain you will be scrubbing at later.
Placement is where you borrow from the cheekbone, not the apples, if you want the lifted modern version, and from the apples if you want the youthful igari flush. For a sun-warmed effect that drifts up toward the temple, the logic is the same as classic draping: you are laying color along a diagonal that lifts the face rather than rounding it. The sunset blush gradient, deeper at the cheekbone fading to nothing, works beautifully in a water-gel formula precisely because the formula stains, so the fade stays put instead of sliding off by lunch.
Not every water-based blush sets at the same speed, and matching the formula to your patience helps. The very pigmented, fast-drying tints like Rare Beauty Soft Pinch demand the one-cheek-at-a-time discipline above, because they are the least forgiving. Gel-cream hybrids such as Glossier Cloud Paint at around $20, or Tower 28 BeachPlease, stay movable longer and blend more like a cream, which makes them a gentler place to learn the tapping motion before you graduate to the quick-setting stains. If you are new to liquid blush, start with the slower formula, get the rhythm down, then switch.
When to set, and when not to
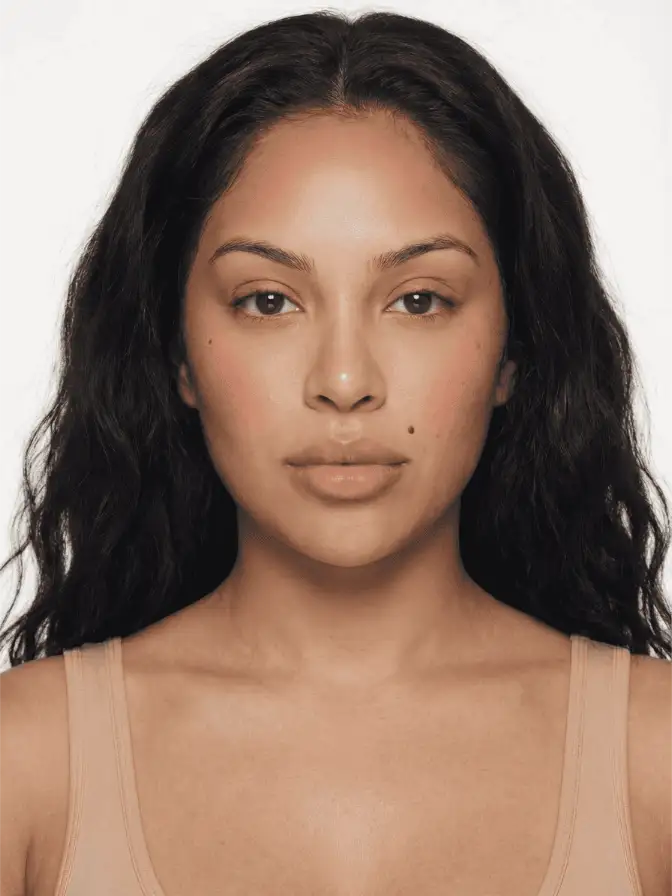
If your skin is dry to normal, do not set the blush at all. The whole appeal of a watercolor cheek tint is that stained, lit-from-within finish, and a dusting of powder over it can dull the glow and, worse, drag the still-setting pigment. If you are oily and need the longevity, set the rest of the face and leave the cheeks bare, or press a sheer translucent powder gently over the blush only after it is fully dry, tapping straight down rather than sweeping. Sweeping is what moves pigment into a streak.
The reason this matters more in summer is simple. Heat and sweat are the conditions where powder blush gives up first, fading and going blotchy by mid-afternoon, while a properly applied stain holds through the same day because it has bonded to the skin rather than sitting on top of it. Get the method right once and the formula that frustrated you becomes the most reliable blush in the drawer. The blotch was never the blush. It was the three seconds you gave it and the surface you gave it to.
Frequently asked
Why does my liquid blush look patchy?
Almost always two reasons: it dried before you blended it, or it grabbed a dry or textured spot on your skin. Pigmented water-gel formulas set in seconds, so any hesitation leaves an edge. Dispense less, work one cheek at a time, and make sure the skin underneath is evenly hydrated rather than flaky or sitting under a mattifying primer.
Do you apply liquid blush before or after foundation?
Either works, but the rule is the same: apply it over something creamy or bare skin, never over powder. Powder grabs the pigment and freezes it in a blotch. Over foundation is fine as long as the foundation is still slightly tacky and you have not set it with powder yet. Then powder last, lightly, if at all.
Continue reading
- technique Puppy eyeliner: the downturned wing for rounder eyes Puppy liner drops the flick instead of lifting it, the opposite of a cat eye. Why the downturned wing flatters hooded and downturned eyes, and how to draw it.
- technique Eyeshadow by Eye Color: The Complementary Rule, Used Well The color wheel says wear the opposite of your eye color. That is true and incomplete. Here is why complementary shadow works, and the nuance for each eye.
- technique Monolid Eyeshadow: The Place-It-Higher Rule On a monolid, shadow set in the anatomical crease vanishes when the eye opens. Here is why placement moves up, and how to build a crease instead of chasing one.